Macro Photography
I usually get asked how I take my pictures, well the answer is easy, it's just a matter of trying and practicing a lot. With this article I'll try to explain everything to do with how I achieve my photography, from the equipment to my settings and also the post-processing techniques that I have.
The equipment:
When I started a bit more seriously with Macro Photography I had my first DSLR a Nikon D3000 and the macro lens I got as a Christmas gift (nice present, don't you think?). I didn't know what I was doing when I started shooting with it but after some time and a lot of practice and pictures I started getting some decent shots. Now I have a Nikon D600 which is a Full Frame camera, maybe not the best option for Macro Photography as a bigger sensor will produce images with a shallow depth of field than an APSC sensor camera, but the quality it gives me compensates that in my opinion.
Later I bought a kit of extension tubes from Kenko, there are more brands that create these kind of rings, even Nikon has their own. The extension tubes let you focus closer to your subjects, but also makes you loose some light, so you will have to compensate your exposure by increasing your ISO, or lowering your shutter speed and/or aperture or by using a flash or some kind of continuos light. The following pictures will show you the magnification I get with my gear by comparing the size of a measuring tape:
D600 + Macro lens
D600 + Macro lens + 12mm tube
D600 + Macro lens + 12mm + 20mm tubes
D600 + Macro lens + 12mm + 20mm + 36mm tubes
D600 + Macro lens + 12mm + 20mm + 36mm tubes but cropped as it was an APSC sensor camera
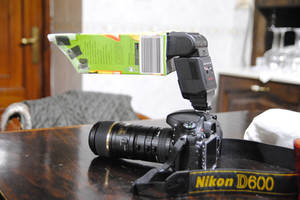
I also have an external flash that I use quite often, at the beginning I used it alone, but the images I got had a lot of strong shadows as I was shooting very close to my subjects so I investigated a bit and the answer was to build my own flash modifier with an orange juice package. It has evolved a lot... I think I'm now on the 3.0 version
The settings:
Usually I set my aperture to a higher number, around f22, f32 or even f64, which is the smallest aperture my lens can get. Sometimes I use bigger apertures like f14, when the subject is very tiny. My shutter speed is usually 1/125 or faster, around 1/160 or 1/200. This is because I almost always shoot in nature and the wind and the insects usually do not collaborate with Macro photographers. The ISO depends on how much available light I have, so anything between 100 and 1000 works fine for me. Higher ISO will produce a lot of noise so I try to avoid it. If I'm using the flash I first set it to TTL metering, but this doesn't work well in all situations, so lately I've been shooting with the flash at full power, and after the first test shot I change the settings of the camera to compensate the exposure.
The lens is always set to manual focus, in the position where it offers the minimum focusing distance.
The shooting:
This is the tricky part of the process. I don't use a tripod, almost all my pictures are handheld, just a few were taken with the camera on a stable surface such as a table. When I spot something I want to shoot, I first try to locate it through the viewfinder, and start moving my camera forward and backward gently, until I think the subject is clearly focused, then hold my breath (important not to move the camera) and press the shutter button.
Heres a little video to show you more or less how I do it, sorry for the low quality
The post-process:
This year I got another fantastic gift for Christmas, a brand new 21.5" iMac, and it's mine!! My precious!!!
I always start with basic settings, like changing the white balance, correcting exposure, adjusting curves... etc. some noise removal, though not too much, and cleaning the dots of dirt that my sensor have (well it's a D600 after all
And that's all I think. I hope this little article to be helpful to anyone interested in starting with Macro Photography. And for those who already do it, what's your process? I'd really love to know it.


